Prerequisite: The Rule Engine is exclusively accessible for the New Content Creation Experience.
Exploring Visibility Rules and Display Conditions
Visibility rules and display conditions serve as essential components in content development and application engagement, allowing content creators to finely tune when and where specific elements are presented to users. In this comprehensive guide, we'll delve into the intricacies of visibility rules, exploring their significance, implementation, and application, along with detailed examples.
Understanding Visibility Rules
Visibility rules enable content creators to control the appearance of elements within an application based on various parameters such as user identity, screen context, timing, user actions, and more. By defining conditions that must be met for an element to be displayed, content creators can deliver tailored experiences that cater to the specific needs and behaviours of users.
Importance of Display Conditions
Display conditions play a pivotal role in optimizing user experiences and driving engagement within applications. Here's why they're essential:
-
Relevance: Displaying content based on user attributes or actions ensures that users encounter information that is pertinent to their current context or objectives.
-
Engagement: By presenting content at the right moment, content creators can prompt user interaction and drive engagement with key features or announcements.
-
Onboarding: Tailoring tutorials or guidance based on user progress or actions simplifies the onboarding process and enhances user comprehension.
Implementation of Visibility Rules
Visibility rules are typically implemented using a rule engine framework integrated within the Studio. This framework allows content creators to define conditions and specify when particular elements should be displayed. Let's examine the common parameters and conditions involved:
|
Condition Type |
Description |
Operators |
|---|---|---|
|
Screen Presence |
Conditions based on element visibility, content, or type |
Is visible/Not visible, Exists/Not exist, Text is, Text is Not, Text is Like, Text is Not Like, Text is Empty, Text is Not Empty, Regex |
|
Timing |
Conditions based on specific dates, times, or user inactivity |
Greater than, Less than, Between |
|
User/App Properties |
Conditions based on user attributes, platform, browser, segments, or user/app data |
Equals, Not equals, Contains, Not contain, Starts with, Ends with, Greater than, Less than, Regex, Is in list, Is not in list |
Examples
Let's explore how visibility rules and display conditions can be applied in various scenarios:
-
Element Presence: A popup appears only when a specific button is visible on the screen.
-
URL-Based Conditions: An announcement is displayed only when users navigate to a particular URL.
-
Timed Announcements: A notification about an upcoming event is shown only during a specified time period.
-
User-Specific Content: A survey is presented to users who have completed a specific workflow.
-
Platform-Specific Content: A message about mobile app updates is shown exclusively to users accessing the application via a mobile device.
Visibility rules and display conditions are indispensable tools for content creators striving to deliver personalized and engaging experiences within applications. By harnessing these capabilities effectively, content creators can optimize user engagement, streamline onboarding processes, and enhance overall user satisfaction. As applications evolve, mastering visibility rules and display conditions will be crucial for staying ahead in user experience design.
Choosing the Condition Type
As a content creator, you can select from various rule types, broadly categorized as Screen Presence, Timing, User Property, and User Action. You can choose specific rules within these categories, detailed below:
Screen Presence:
|
Condition Type |
Description |
Operators |
|---|---|---|
|
On Screen Element
|
Checks an element on-screen for visibility, content length, or type |
|
|
URL
|
Checks either the current URL or the referral URL (the URL from which the user navigated) In the context of the same app, the system should auto-identify the page |
|
To see examples for each condition type, click Screen Presence as a Visibility Rule
Timing:
|
Condition Type |
Description |
Operators |
|---|---|---|
|
Date |
Checks dates like day of the week, month, or specific dates |
|
|
Time |
Checks specific time of the day (HH:MM) for the end user |
|
To see examples for each condition type, click Timing as a Visibility Rule
User Properties:
|
Condition Type |
Description |
Operators |
|---|---|---|
|
User Data
|
Checks cookies in the user’s browser, JavaScript variables, or other data. Also, data based on window storage, local storage, session storage, cookie storage. |
|
|
Platform |
Checks the platform Apty is running on -Windows/Mac/Mobile |
|
|
Browser |
Checks the current browser type for the end user |
|
To see examples for each condition type, click User Properties as a Visibility Rule.
User Actions:
|
Condition Type |
Description |
Operators |
|---|---|---|
|
User Activity |
Checks whether a checklist or other content has been finished by the end user |
|
|
Clicks/Hovers (Autotrigger) |
Triggers workflow based on user click/hover on an element |
|
|
Input Value (Autotrigger) |
Based on the value the user inputs in a field |
|
|
User Inactivity (Autotrigger) |
If the user remains inactive for a certain period of time |
|
To see examples for each condition type, click User Actions as a Visibility Rule.
Understanding and effectively utilizing these rules will enable you to create dynamic and context-sensitive content, enhancing the overall user experience by displaying the right content at the right time based on various conditions.
Setting Up Visibility Rules: A Step-by-Step Guide
-
Log into Apty Studio:
-
Begin by logging into the Apty Studio.

-
-
Access Workflows:
-
Proceed to the "Workflows" section.

-
-
Select Workflow:
-
Locate and open the desired workflow where you intend to implement visibility rules.
-
-
Access Visibility Icon:
-
Select the visibility icon positioned on the START icon.

-
-
Name the Rule:
-
Input a descriptive name for your rule.

-
-
Define Conditions:
-
Follow the If This Then That (IFTTT) rule structure for your conditions.
-
Incorporate the required conditions as per your specifications.

-
-
Add Additional Conditions:
-
Click on the "+Action" button to append additional conditions to your rule.

-
-
Save your visibility rule.
Only one visibility rule is permitted per workflow, yet multiple conditions can be incorporated into this rule.
Exploring Visibility Rules for Different Content Types:
Workflow
Every time a content creator designs a workflow for a business process, they meticulously define display conditions. These conditions determine when and to whom the content will be visible, ensuring it's presented only under specific circumstances.
Workflow has 3 types of rules: Visibility rules, Auto-trigger rules & Split step rules.
-
Visibility rules: Based on the display conditions, content creators can decide when to show workflow in the widget or hide workflow from the widget. The visibility rule is applied at the workflow level.
-
Auto-trigger rules: Based on the auto-trigger conditions applied to a step of a workflow, content creators can auto-trigger a workflow from that step in case the conditions are met.
-
Split step rules: Used to create conditional paths within a workflow.
Example: For instance, consider a scenario where a financial institution seeks to implement sophisticated display conditions. They may desire a setup where a workflow automatically triggers playback whenever end-users encounter errors on their interface. This automation ensures that users receive timely assistance precisely when they encounter challenges, enhancing overall user experience and operational efficiency.
Validations
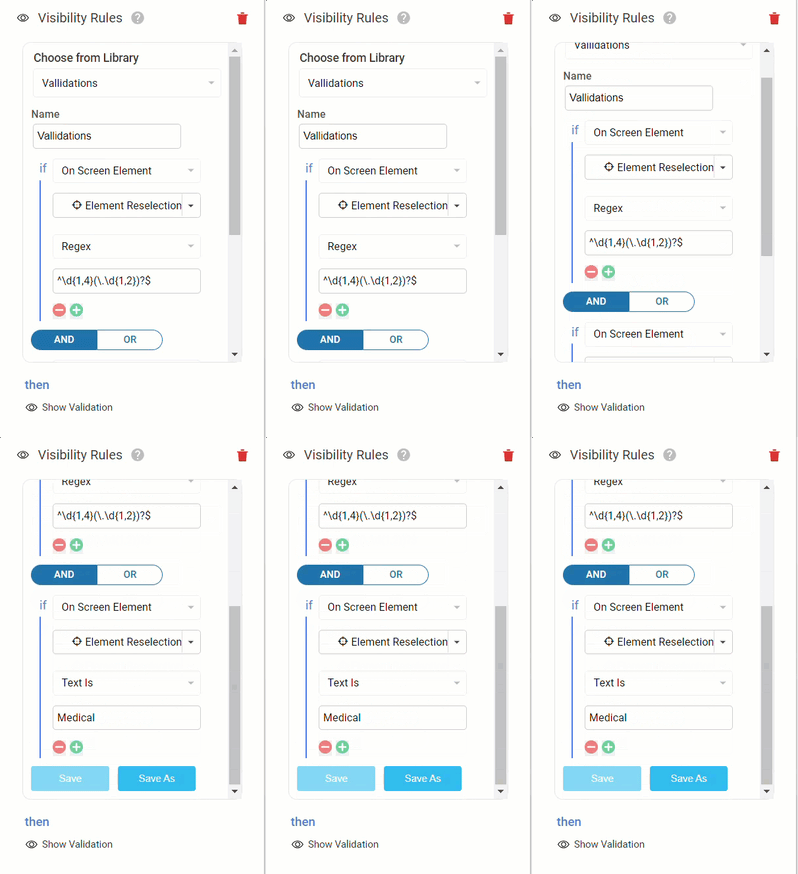
When content creators establish validations for input fields within a business process, they often require these validations to be activated under specific conditions. These conditions typically hinge on the user's interactions with the input fields within the host application. These validations, known as contextual and dependency validations, ensure that the data entered meets predetermined criteria.
The Rule Engine in the validation system allows content creators to set up conditions precisely. This ensures that validations only happen when the right conditions are met.
Example: For instance, let's consider a scenario involving a company named 'XYZ'. They stipulate that for leads originating from the medical industry, the revenue amount must exceed $50,000. In this case, the validation would only be triggered if a user selects 'retail' from the industry type dropdown and enters a revenue value below the designated threshold. This setup allows for granular control over when validations are applied, ensuring data accuracy and compliance with business rules.
Tooltips
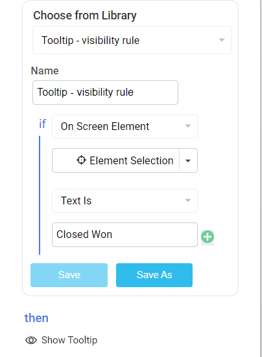
When content creators creates tooltips to enhance user understanding of specific on-screen elements, they often incorporate display conditions to ensure optimal user experience. These conditions dictate when the tooltip should be presented, tailoring its visibility to specific user actions, on-screen elements, or even the current URL.
Example: In a sales management application, you want to provide guidance when users reach the "Closed Won" stage for a deal. You decide to display a tooltip when users navigate to the "Closed Won" stage on the deal details screen.
Launchers
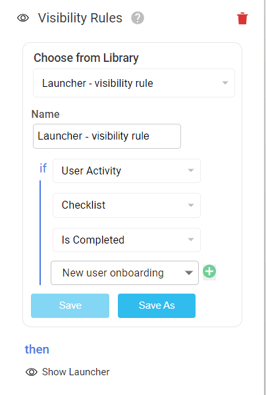
When content creators design launchers to promptly draw users' attention to essential elements like workflows, videos, or URLs, they frequently integrate specific display conditions. These conditions ensure that the launcher is presented selectively, targeting a particular subset of users based on predefined criteria. These criteria may encompass various factors such as on-screen elements, user interactions, or even the current URL, thus optimizing the user experience.
Example: Let's take the case of client 'XYZ,' who seeks to implement a survey button launcher within their application. However, they want this launcher to be visible exclusively to users who have completed all the onboarding checklist items. By setting up such tailored display conditions, 'XYZ' ensures that the survey button is displayed only to users who have fulfilled the prerequisite conditions, enhancing the relevance and effectiveness of the launcher. This targeted approach boosts user engagement and makes it easier to gather feedback, resulting in a better overall user experience.
Announcements
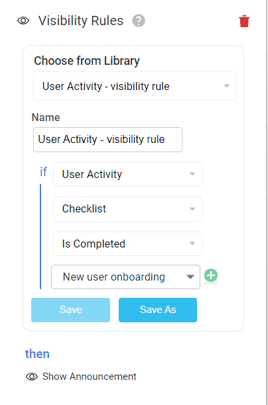
When content creators create announcements to communicate crucial information to users, they often incorporate specific display conditions. These conditions ensure the announcement is presented selectively, targeting a particular subset of users based on predetermined criteria. These criteria can vary, encompassing factors such as on-screen elements, user interactions, or the current URL, thus optimizing the announcement's impact and relevance.
Example: In a scenario with client 'XYZ,' they want to show a congratulations announcement within their application, but only to users who achieve specific milestones, such as completing a specific set of tasks. By using tailored display conditions, 'XYZ' ensures the message is delivered when it's most relevant. This targeted communication boosts user recognition and enhances their experience with the platform.
Auto Trigger (Workflows)
Currently, end users need to search for a workflow in the widget and click on it to start, which can create friction and delay in providing immediate help.
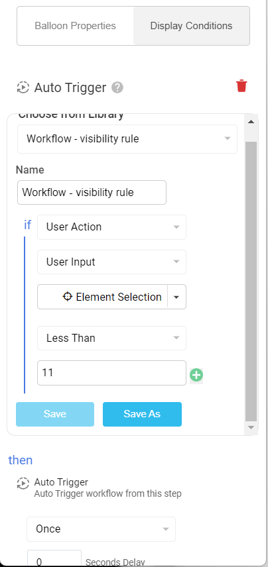
This update enables content creators to configure auto-triggers for workflows based on defined display conditions. By specifying these conditions, workflows will automatically initiate when the criteria are met, eliminating the need for manual search and initiation, thereby providing users with immediate, context-sensitive assistance.
This feature allows content creators to configure workflows to automatically trigger based on predefined conditions, ensuring users receive guidance exactly when and where they need it.
Creating Automatic Triggers: A Step-by-Step Guide
-
Open Workflow Step:
-
Open the workflow step where you want to add an automatic trigger.
-
-
Access Display Conditions:
-
Navigate to the top of the Studio.
-
Click on "Display Conditions".

-
-
Name the Rule:
-
Enter the rule name.

-
-
Define Conditions:
-
Add the required conditions for the automatic trigger.

-
-
Add Additional Conditions:
-
To add more conditions, click the plus icon.

-
-
Save the Rule:
-
Click "Save" to save the visibility rule.
-
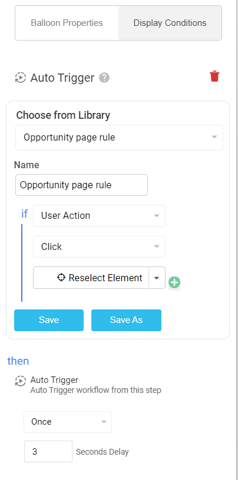
Example:
A Salesforce Lightning application automatically triggers a workflow when a user navigates to the "New Opportunity" tab. This workflow guides the user through the process of creating a new opportunity.
Split Step (Workflows)
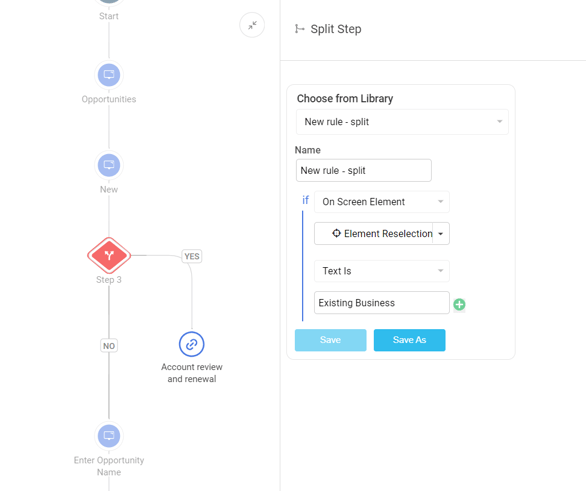
As a content creator, you can now set up advanced display conditions for jump step functionality in workflows, allowing the workflow to navigate to the required step (either within the same workflow or a different one) based on specified conditions.
Previously, the jump step functionality in the studio allowed content creators to add jumps based on a limited set of conditions, primarily focused on element presence and storage. This update expands the range of conditions available and makes the process more intuitive and user-friendly.
Adding a Split Step: A Step-by-Step Guide
-
Select Workflow:
-
In a new or existing workflow, hover between the steps where you want to add the split step.
-
-
Add Split Step:
-
Click the plus icon.
-
Select "Add Split" from the menu.

-
-
Create Visibility Rule:
-
In the horizontal view of the Studio, open the side panel.
-
Choose to create a new visibility rule or select one from the library.

-
-
Name and Define Conditions:
-
Give the new rule a name.
-
Add the required conditions.

-
-
Add Additional Conditions:
-
To add more conditions, click the plus icon.

-
-
Save the Rule:
-
Click "Save" to save the visibility rule.
-
By following these steps, you can easily create and customize split steps in your workflows.
Example:
Consider a scenario where users need to follow different processes based on the type of business (e.g., new vs. existing). In this case, when creating a new opportunity, users can select "New Business" to proceed with the standard opportunity creation process, while choosing "Existing Business" splits the workflow, directing users to the account renewal process.
