
Enhanced Content Creation Experience
Check out what's new, updated, or modified in Apty!
Workflow Creation Redesign
Apty’s enhanced UI/UX design in the low code/no code platform provides a faster and more intuitive process for creating Apty content. A content creator/admin can efficiently record workflows with little to no programming skills, and get a bird's eye view of all the workflow steps in a flowchart or a balloon style for on the fly changes. Thus, reducing the time to create Apty content and improving organizational productivity and efficiency.
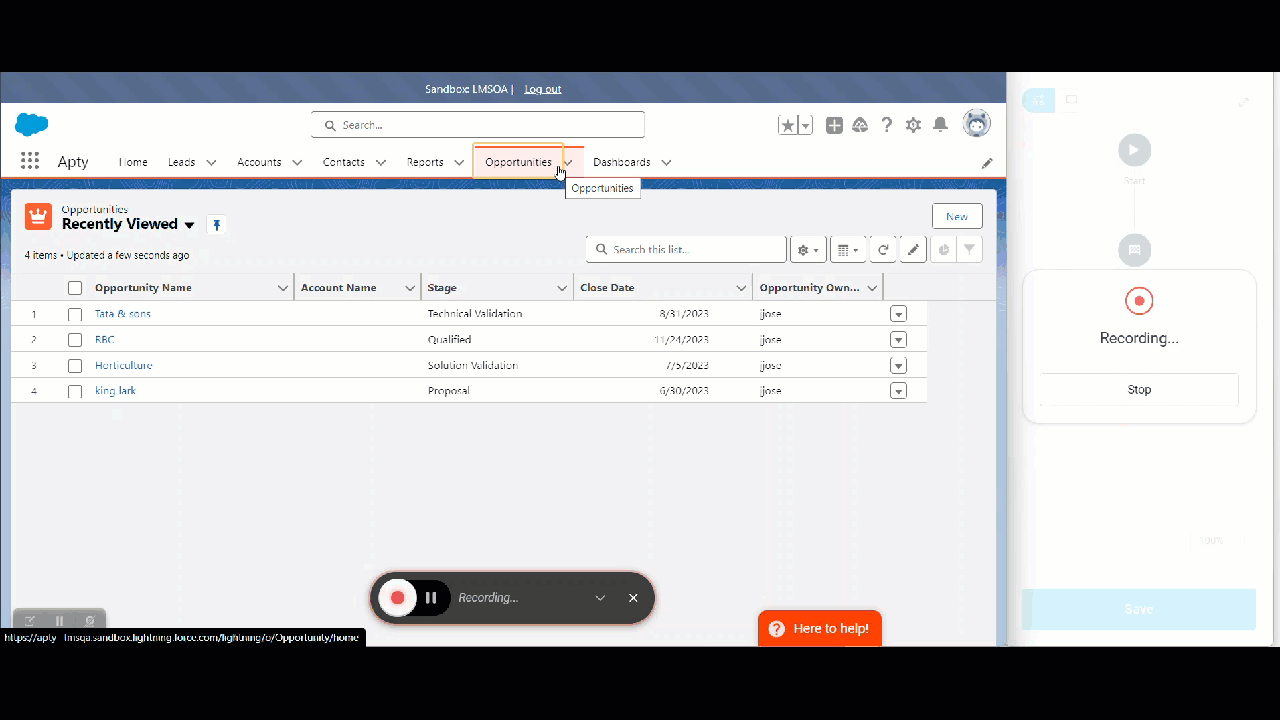
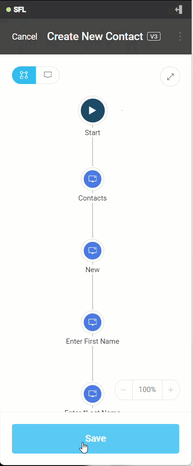
While creating a workflow, the Apty Studio allows you to record each step without switching between screens in your application. Apty, by default, presents all the steps in a flowchart once complete, which makes it easier to visualize the workflow from a bird’s eye perspective.
Users can easily switch between Record and Navigate modes for creating and reviewing workflows seamlessly. The Apty Widget floats and overlays to optimize full-screen mode while keeping the studio mode visible while capturing the process workflow.
Record Mode :
In Record mode, creators can record steps and edit them in real-time. Floating and overlay of Apty Widget will help users to optimize the full screen mode while keeping the studio mode visible and compact when capturing each step. They can also move the widget around to see the elements that might be hiding behind the widget.
Content Creators can also toggle between record and navigate modes for easier and faster workflow creation. This toggle comes in handy especially when the next step/element is not on the same screen.
In this mode, we can utilize the rich text editor to edit the balloon content. Additionally, we can expand the widget to adjust the other workflow step settings, such as modifying the “Advanced On” option and the “Highlight” option.
Navigate Mode :
Navigate mode allows for recording and editing steps at the end of the process.
Info:
-
To toggle between recording and navigating, we can either click the buttons on the recorder or utilize these keyboard shortcuts :
-
Option key on Mac
-
Alt key on Windows
-
-
To stop the recording, we can either click "Stop" in the Studio, or press the close button on the widget.
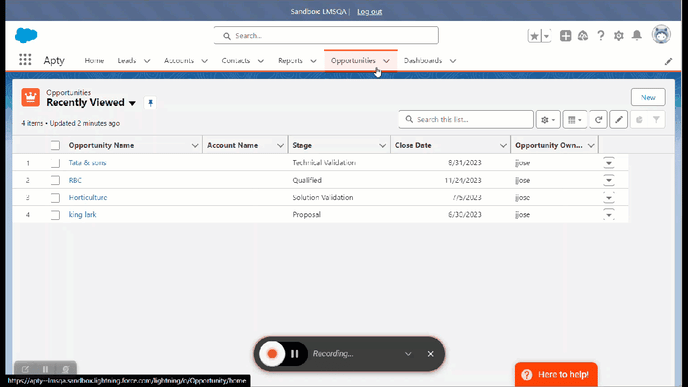
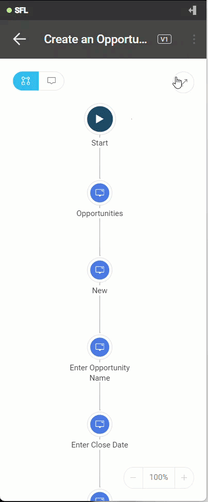
Flowchart Visualization
Let's say we've captured all the steps of the workflow. Once that's done as part of your business process, you'll get to see an overview, commonly referred to as the Flowchart View ![]() , which depicts the workflow from start to finish.
, which depicts the workflow from start to finish.
The Workflow flowchart gives a bird's eye view of all the Workflow steps recorded, enabling you to modify them in real-time, identify potential bottlenecks, and optimize the user journey during the Workflow creation process. The Start ![]() and End
and End ![]() icons of the flowchart serve as markers for the starting and finishing points of the Workflow, respectively. While a flowchart gives you a vertical view of the workflow, Apty also provides a horizontal visualization style, commonly known as ‘Balloon Style.’ You can toggle between any visualization style at any point in time to edit the steps in inline or offline modes to edit the steps in inline or offline modes, respectively. Some key benefits of the Workflow flowchart are as follows:
icons of the flowchart serve as markers for the starting and finishing points of the Workflow, respectively. While a flowchart gives you a vertical view of the workflow, Apty also provides a horizontal visualization style, commonly known as ‘Balloon Style.’ You can toggle between any visualization style at any point in time to edit the steps in inline or offline modes to edit the steps in inline or offline modes, respectively. Some key benefits of the Workflow flowchart are as follows:
-
The visual depiction of the flowchart makes it simpler for the user to understand where and when the Workflow is branching. Once the Content Creators start creating the workflow in record mode, they should be able to see the workflow steps popping up in flowchart mode.

-
Without having to switch between your Apty Studio screens, you may add new or intermediate steps, branch out to another workflow (by adding splits), show any announcement pop-up that is not tied to any step in the workflow (we call it a ‘Floating Step’), and play, publish, or delete any workflow. You can also check old versions and history, and access all the workflow settings instantly through a single screen in the flowchart view.
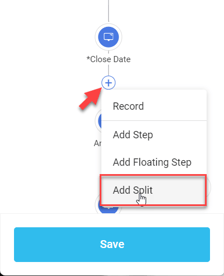
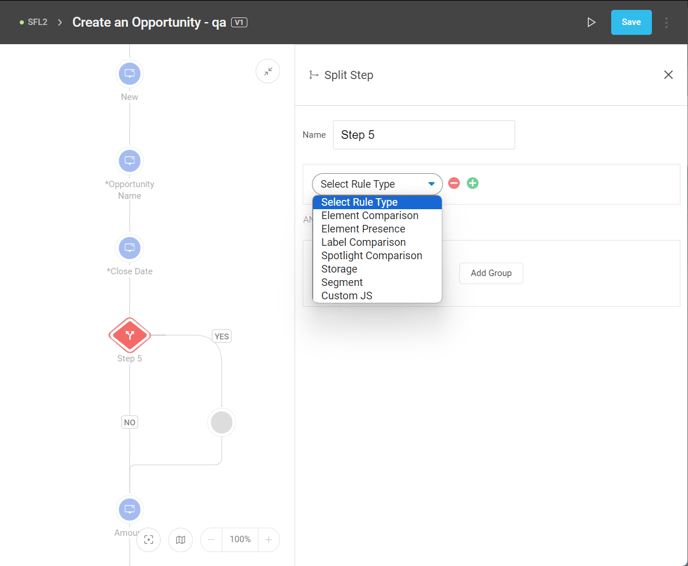
Adding a Split Step
To add a split step:
-
Click on the plus
 icon between the steps you want to add the split step.
 -
Select Add Split from the options.
-
The Studio will appear in full-screen view.
-
Rename the step, and add your split step's rule(s).
-
After the rules have been added, click the close
 button on the top right corner of the studio.
 -
Hover over the flow line connectors, and click the plus
 icon that appears.
 -
Select Link To.
-
Select the workflow and step you want to jump to from the popup window.

- Click Save.
Timer for Jump (Split) Step
This update adds a configurable timer to the Jump (Split) step in workflows. When dealing with applications that have slower load times, this ensures the workflow waits for the necessary element before proceeding, preventing false negatives in execution.
Who Should Use This?
-
Apty Content Creators
-
Apty Administrators
-
Technical Consultants
Where to Find It
When configuring workflows in the Apty Studio (using the New Content Creation Experience), you can now find an option to add a timer to any Split Step within the workflow editor. The timer is defaulted to 2 seconds but can be adjusted based on the application’s performance.
.gif?width=688&height=352&name=split%20wait%20time%20(1).gif)
Key Benefits
This enhancement ensures that workflows wait for the split step to be fully visible before proceeding, preventing unnecessary execution failures due to slow-loading applications.
Adding a Floating Step
To add a floating step:
-
Hover between the steps you want to add the floating step.
-
Click the plus
 icon, and select Add Floating Step.
 -
A balloon will appear on the application. You can add your content here and complete the formatting for it.

-
Click Save.
Create a Survey or Feedback Message
To include a Success Message or Feedback Survey at the end of your workflow, click the Plus icon following the End icon in your recorded workflow.
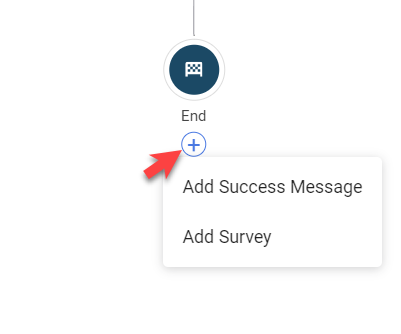
To add a Success Message:
-
Create a success message by clicking the plus icon
 .
. -
An icon
 for the success message will appear.
 -
Click on the icon, and a balloon will appear on the application.
-
To edit, click on the content area of the balloon and start editing using the inline editor.
-
Click Save on the Studio.

To add a Survey:
-
Create a survey by clicking the plus icon
. -
An icon
 for the survey will appear.
 -
Click on the icon, and a balloon will appear on the application.
-
To edit, click on the content area of the balloon and start editing using the inline editor.
-
Click Save on the Studio.
Saving the Workflow
To save a workflow:
-
If any changes have been made to your workflow, a Save button will appear at the bottom of the studio.
-
By clicking on it, any modifications or added content will be saved.
Previewing the Workflow
To preview a workflow after creating your business process and completing all formatting, review the workflow to make any necessary changes before publishing it to end users. You can do this by using the Preview option, which plays the workflow from start to finish, allowing you to test it from an end-user perspective. Here's how:
-
Click on the vertical ellipsis
 on the top right of your Apty studio.
 -
Select Preview Workflow from the list of options.
-
You'll see a preview of the process you created.
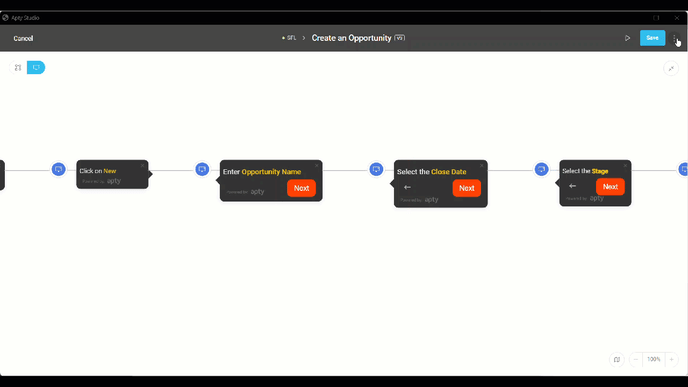
Publishing the Workflow
If modifications have been made and you want them to reflect in the application, publish the changes.
-
Click on the vertical ellipsis
on the top right of your Apty studio. -
Select Publish and choose the environment where you want to publish the workflow.
-
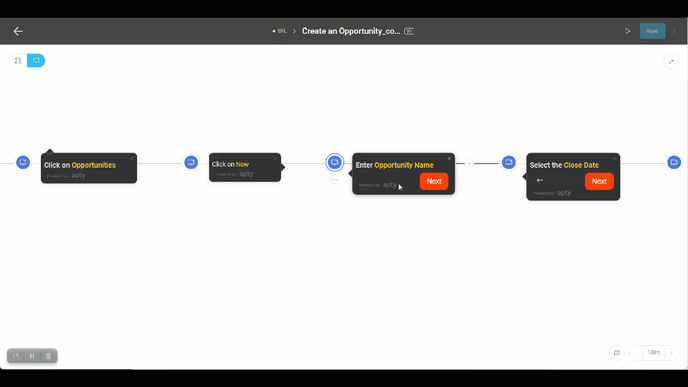
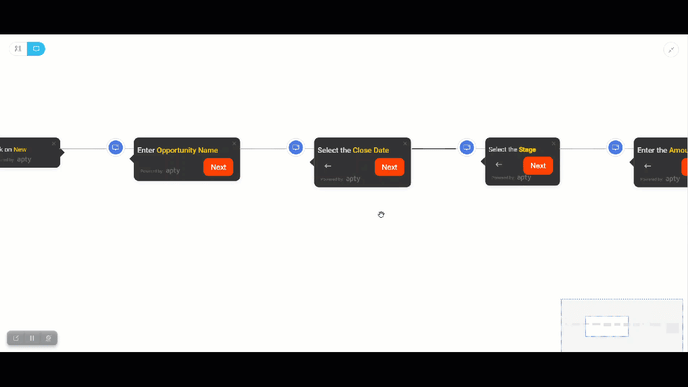
Depending on your preference, you can maximize or minimize the Apty Studio using the double-headed arrow to get a horizontal or vertical perspective of the flowchart. For people who like to see workflow from top-to-bottom there is a vertical view of a flowchart and for those who like to see the workflow as a timeline – there is a horizontal scroll in the form of a balloon visualization.
|
Vertical view |
Horizontal view |
|---|---|
|
|
|


Balloon Visualization
Your Workflow’s horizontal view or Balloon View![]() in navigation mode features balloon visualization, which enables quick inline editing and theme preview. While in recording mode, you can perform inline editing and also access the recorder for all the balloon settings to provide a better user experience. The Workflow balloons can be set to automatically resize based on the text size by Content Creators, ensuring content relevance and alignment within the application.
in navigation mode features balloon visualization, which enables quick inline editing and theme preview. While in recording mode, you can perform inline editing and also access the recorder for all the balloon settings to provide a better user experience. The Workflow balloons can be set to automatically resize based on the text size by Content Creators, ensuring content relevance and alignment within the application.
And when the workflow becomes too big to fit on the screen even though you are on full screen mode – specially when there are too many steps in workflow – you can zoom in and out of the workflow for better view
Irrespective of which direction you are scrolling – you are zooming in or out – you can jump to any step – click on it and start editing.
Additionally, there's a Minimap available for zooming in and out within the Balloon view.
Minimap
You can now visualize and navigate through complex Workflows with ease by using a representative minimap![]() .
.
%20(1).gif?width=688&height=306&name=minimap%20(1)%20(1).gif)
Inline Editing
The text editor is appended to the Workflow balloon for faster and more accurate Workflow refinement, reducing editing time. You can quickly edits balloons with real-time previews, ensuring polished and error-free workflows before implementation.
This inline editing feature is accessible both at the step level and at the end of the workflow. 
To learn more, see Use the Apty Text Editor.
Theme/Appearance Preview
Customized themes from Admin Portal can be selected to change the look of your workflows. Preview these themes in real time to ensure brand alignment and create visually appealing workflows that engage end users.
PATH: Vertical Ellipses > Settings > Theme/Appearance > Select theme of your choice
For more information, refer to Create Workflows.
Unpublished Content Alerts for Content Attachments
If there is unpublished content B linked to content A, upon attempting to publish content A, the user will be alerted with a warning message stating that content B has not been published.
The new warning messages ensure that only published content linked to content reaches end users, maintaining quality control of the content and ensuring a controlled experience for the end users.
If content A is published but its attached content isn’t, it won't be visible to end users.
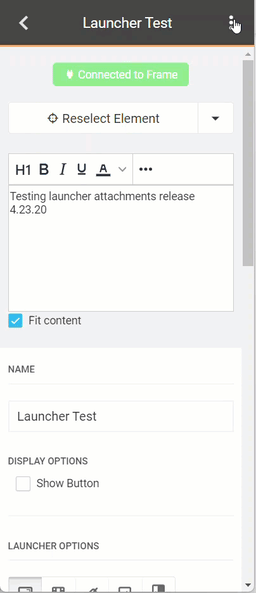
In the image below, the “Launcher Test” launcher has the action to initiate the “Creating New Leads” workflow, which is not published.
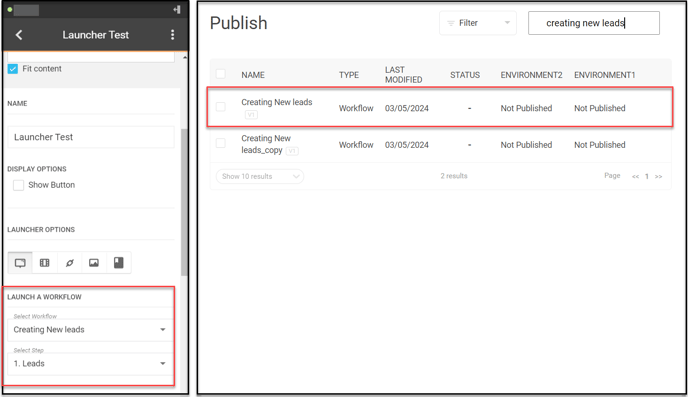
In the GIF below, when attempting to publish this launcher, a warning appears indicating that the workflow has not been published and asking if we want to proceed with publishing the launcher.
Save and Reuse Custom Scripts
By incorporating the feature of ‘Save and Reuse Custom Scripts’, the necessity to repeatedly rewrite similar custom scripts is eradicated, thus conserving significant time and effort. You have the ability to seamlessly integrate your script into any content by saving it as a template, streamlining the process across all content for element selection, announcement conditions, and validators. This ensures effortless content creation.
Adding Custom Scripts as Templates
From Admin:
-
Log in to the Admin Portal.

-
Select your Application from the left panel and then click Manage Application settings
 .
. 
-
On the Manage Current Application page, select Content Level Javascript.

- Click on New Custom JS.
-
Enter the name for the Custom Script template, and add your script.

- Click Save.
-
Log in to the Apty Studio.

-
Navigate to the content type (here an example of a workflow step is provided) where you want to add a new custom script.
-
Select Custom Script from the element selection options.

-
Add your script, then select “Save this script as a new template”.

- Enter the name for the Custom Script template.
-
Click Save.
Adding a Custom Script template to your content:
-
Log in to the Apty studio.
-
Navigate to the content type (here an example of a workflow step is provided) where you want to add a custom script.
-
Select Custom Script from the element selection options.
-
Select the template you want to use from the Custom Script Library.
-
Click Save.
What happens if we edit an existing custom script template?
-
If changes are made to a custom script in the studio, a copy of it is made, while the original template remains intact.
-
You have the option to either save this as a new template or retain it as a regular custom script.
-
Any permanent changes to a custom script template can only be done from the Admin Portal.
SCIM User Provisioning
Additionally, the integration of a System for Cross-Domain Identity Management (SCIM) simplifies user management, making administrative tasks more efficient. It lets you centrally manage users and their access from your AD (Active Directory). Changes made are automatically updated to all connected applications, allowing instant updates and management at scale.
To delve into detailed configuration steps for SCIM User Provisioning, you can refer to this article Provision users and groups using Microsoft Entra (SCIM)