
This document provides step-by-step instructions on how to utilize your Active Directory Group Policy Management against Google Chrome templates, to deploy the Apty Client Browser extension to all PCs in your organization.
Topics
- Step 1: Downloading Chrome Policy Templates
- Step 2: Adding Chrome .admx and .adml files to Group Policy
- Step 3: Create or Configure your Chrome Policy
- Step 4: Check Your Chrome Policies
Step 1: Downloading Chrome Policy Templates
1. Download Chrome templates by visiting the link below:
https://dl.google.com/dl/edgedl/chrome/policy/policy_templates.zip
2. Extract archive in the temporary location
Step 2: Adding Chrome .admx and .adml files to Group Policy
1. Navigate to the directory in which you extracted the Policy Templates and copy the chrome.admx file located at\policy-templates\windows\admx directory toC:\Windows\PolicyDefinitions
2. Navigate to the directory in which you extracted the Google Chrome Bundle and copy the chrome.adml file located within the policy-templates\windows\admx\en-USdirectory toC:\Windows\PolicyDefinitions\en-US
Note: If a different language is desired instead of en-US, please navigate to the directory for the correct language of your choosing. Ex: es-ES
Step 3: Create or Configure your Chrome Policy
1. Open the Group Policy Manager on your domain controller and expand out your domain -> Group Policy Objects. If you currently do not have a Group Policy created in which you want to utilize for Chrome Policies, proceed to right clicking on Group Policy Objects and create a New Policy.
2. Name the policy something relevant. Ex: “ChromePolicy”
3. Once created, right click the new policy and select Edit.

4. Expand out Chrome Policy > Computer Configuration > Policies -> Administrative Templates > Google Chrome > Extensions then right click and Edit the Configure the list of force-installed apps and extensions
5. Select the Enable radio button, and then click the Show button.

6. Add the following value.
|
bpgnbhpmapjejjgieobojikijibkabnl;https://apty-assist-production-s3.s3.amazonaws.com/production/{tenant-id}/update.xml |
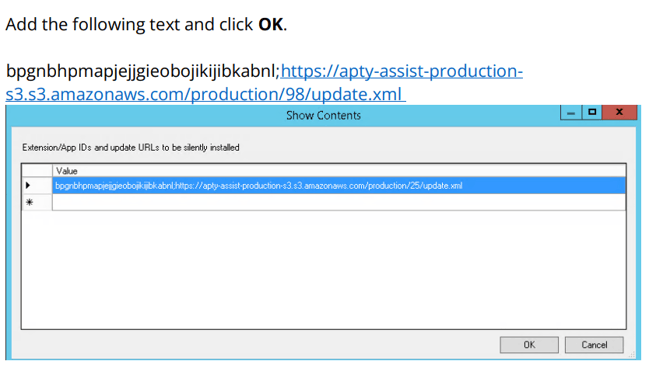
7. Click OK
Note: Tenant ID will be provided to you by the Customer Support team.
8. Click Apply, and then click OK.

9. Next, right click the Configure extension installation whitelist and select Edit from the context menu.

10. Select the Enabled radio button, and then click the Show button.
11. Add the Extension ID and Click OK.
12. Click Apply and then click OK.

13. Exit the Group Policy Management Editor, Right Click the OU of your choice, in which contains your Computers or Users and select Link an Existing GPO.
14. Select the “Chrome Policy”(the one which is created now) and click OK.
15. For any PC or User within that OU, the “Chrome Policy” will automatically install the Apty Client Browser Extension.
Step 4: Check Your Chrome Policies
1. On a target client device, open Chrome Browser and navigate to chrome://policy to see all policies that are applied.
2. You can also check your extension by navigating to chrome://extensions and ensuring your extensions are being forcefully installed.
Note: You may need to run gpupdate/force, in an elevated command prompt, to apply this new group policy to the PCs.
Introduction
This document provides step-by-step instructions on how to utilize your Active Directory Group Policy Management against Microsoft Edge templates to deploy the Apty Client Browser extension to all PCs in your organization.
Topics
- Step 1: Downloading Edge Policy Templates
- Step 2: Adding Edge .admx and .adml files to Group Policy
- Step 3: Create or Configure your Edge Policy
- Step 4: Check Your Edge Policies
Step 1: Downloading Edge Policy Templates
1. Download Edge templates by visiting the link below
https://www.microsoft.com/en-us/edge/business/download
2. Choose your operating system and Edge version.
3. Click Get Policy Files.
4. Browse to the directory in which you saved the downloaded Microsoft Edge Policy Templates.zip file. Extract the contents of the Microsoft Edge Policy Templates.zip file to your desired location. Example: C:\temp
Step 2: Adding Edge .admx and .adml files to Group Policy
1. Navigate to the directory in which you extracted the Microsoft Edge Templates zip file and copy the msedge.admx file located within the\windows\admx directory to C:\Windows\PolicyDefinitions
2. Navigate to the directory in which you extracted the Microsoft Edge Templates zip file and copy the msedge.adml file located within the\windows\admx\en-US directory to C:\Windows\PolicyDefinitions\en-US
Note: If a different language is required instead of en-US, please navigate to the directory for the correct language of your choosing.Example:es-ES
Step 3: Create or Configure your Edge Policy
1. Open the Group Policy Manager on your domain controller and expand out your domain -> Group Policy Objects. If you currently do not have a Group Policy created in which you want to utilize for Chrome Policies, proceed to right-click on Group Policy Objects and create a New Policy.
2. Name the policy something relevant. Example: “Edge Policy”
3. Once created, right-click the new policy and select Edit.
4. Expand out Edge Policy -> Computer Configuration -> Policies -> Administrative Templates -> Microsoft Edge -> Extensions then right click and Edit in the “Control which extensions are installed silently”
5. Select the Enable radio button, and then click the Show button.
6. Add the following value.
|
bpgnbhpmapjejjgieobojikijibkabnl;https://apty-assist-production-s3.s3.amazonaws.com/production/{tenant-id}/update.xml |
7. Click OK.
Note: The Tenant ID will be provided to you by the Customer Success Manager.
8. Click Apply and then click OK.

9. Next, right-click the Configure extension installation whitelist and select Edit from the context menu.
10. Select the Enabled radio button, and then click the Show button.

11. Add the following text and click OK.
https://apty-assist-production-s3.s3.amazonaws.com/*
12. Click Apply and then click OK.

13. Exit the Group Policy Management Editor, right-click the OU of your choice, which contains your Computers or Users, and select Link an Existing GPO.
14. Select the “Edge Policy” (the one which is created now) and click OK.
15. For any PC or User within that OU, the “Edge Policy” will automatically install the Apty Client Browser Extension.
Step 4: Check Your Edge Policies
1. On a target client device, open Microsoft Edge and navigate to edge://policy to see all policies that are applied.
2. You can also check your extension by navigating to edge://extensions and ensuring your extensions are being forcefully installed.
NOTE: You may need to run gpupdate /force, in an elevated command prompt, to apply this new group policy to the PCs.